“LSE Trailblazers” was a project that formed part of Curriculum Shift, LSE’s move to online teaching that was made necessary by the effects of the 2020 coronavirus pandemic. The aim of Trailblazers was to enhance a selection of courses from across the School such that they would stand as exemplars of good practice in online and blended learning design. To this end, the School appointed an e-learning consultancy, SkillEd, to work with course convenors on the design of these courses. Eleven courses were developed over the course of the 2020 summer in preparation for teaching in the Michaelmas Term of that year. A condition of the work was that the course development must make use of existing technologies already available within LSE.
This page presents the best of the innovative approaches and features used in the Trailblazer courses. Each section provides a description of the innovation, a screenshot showing an example, and an explanation of the benefits. There are then directions for implementing this innovation in your own course, with links to existing online guidance.
You can quickly skip to each section by clicking on the section title links below:
Compact easy-to-use courses
Most Trailblazer courses make use of a simple and compact course format that lays out the content attractively and makes it easy for students to find their way to what they need.
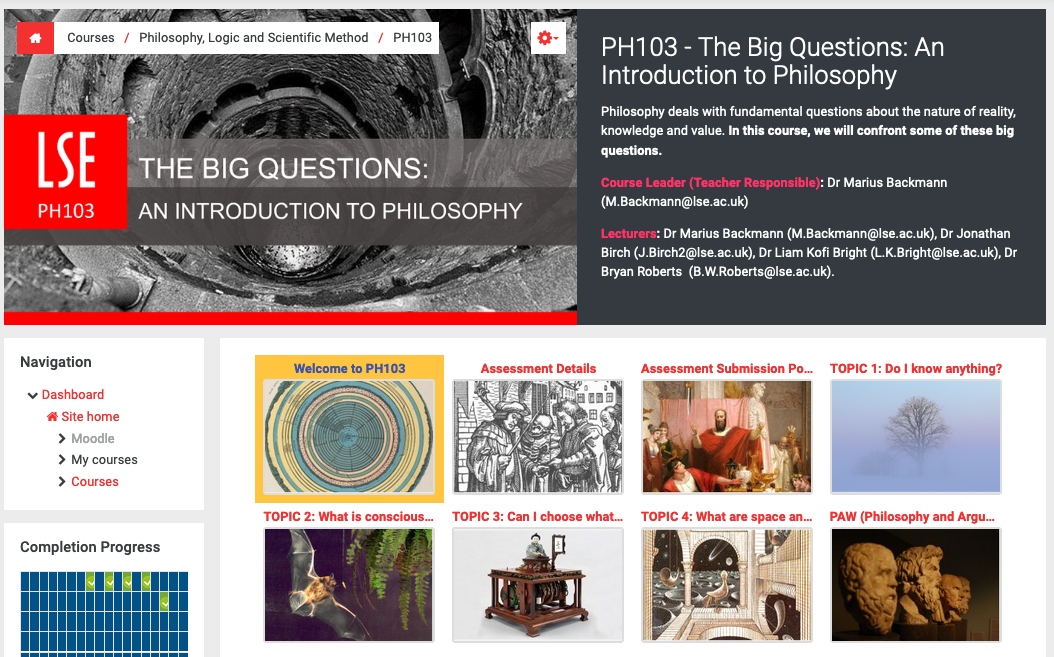 Course header and grid layout for PH103
The example shows the following features:
-
An attractive course image at the top, with a concise summary text alongside. This creates a good first impression, but occupies minimal space at the top of the course. Remember that this will appear every time the student accesses the course, so it should not occupy a large expanse of screen area that has to be scrolled past each time.
-
Underneath, the course content is divided into logical categories, laid out in a grid format. Elements of the grid represent either course content, divided into weekly or topic-based sections, or ancillary content, grouped into meaningful categories such as assessment. This makes it very easy for students to find what they need.
-
There is no, or limited, additional content in between the course header and the grid. Such content is displayed every time the page is loaded, and as such it is usually just something that the student must scroll past to get to what they need.
How you can do this
-
Change your course to use ‘Grid’ format (Changing the course format)
-
Add a suitable course image and write a course summary of <100 words (Adding course summary and image)
-
Choose and name your sections carefully. As well as separate sections for general course information and assessment, you will most likely have a section for each week, or for each topic area. Be rigorous about putting content only into the section it belongs to - if there is an assessment section, students should expect to find everything relating to assessment there.
- Move the ‘General’ (top) section into the grid, to avoid having a list of general resources ever-present at the top of the page. This keeps the layout clean and avoids unnecessary scrolling. To do this, look for the link Move section into grid at the bottom of that top section.
Weekly schedules to optimise students's use of study time
Trailblazer courses make use of weekly schedules to lay out the sequence of learning activities that a student is expected to complete, along with estimated timings for each. These schedules are then mapped to a weekly ‘book’ that contains all of the resources the student needs in order to complete those learning activities.
 Weekly schedule from ST102, with contents of associated ‘Book’
The schedule leaves the student in no doubt as to what is required of them, and the estimated timing allows them to allocate their effort appropriately. The arrangement of the resources into a Moodle ‘Book’ encourages students to tackle the learning activities in the appropriate order and means that they do not waste any time searching for resources.
How you can do this:
-
Estimate how long you expect students to spend on each learning activity. Of course, timings will vary between students in practice, but these guide timings will allow them to see which activities require more time than others.
-
Create a Moodle Book to hold all that week’s resources (Adding a Moodle Book).
-
Add a table to the first page of the Book, to hold the weekly schedule

Embed videos for ease of use and visual appeal
Embed videos directly into the Moodle page, making them easy to access and creating an attractive learning environment.
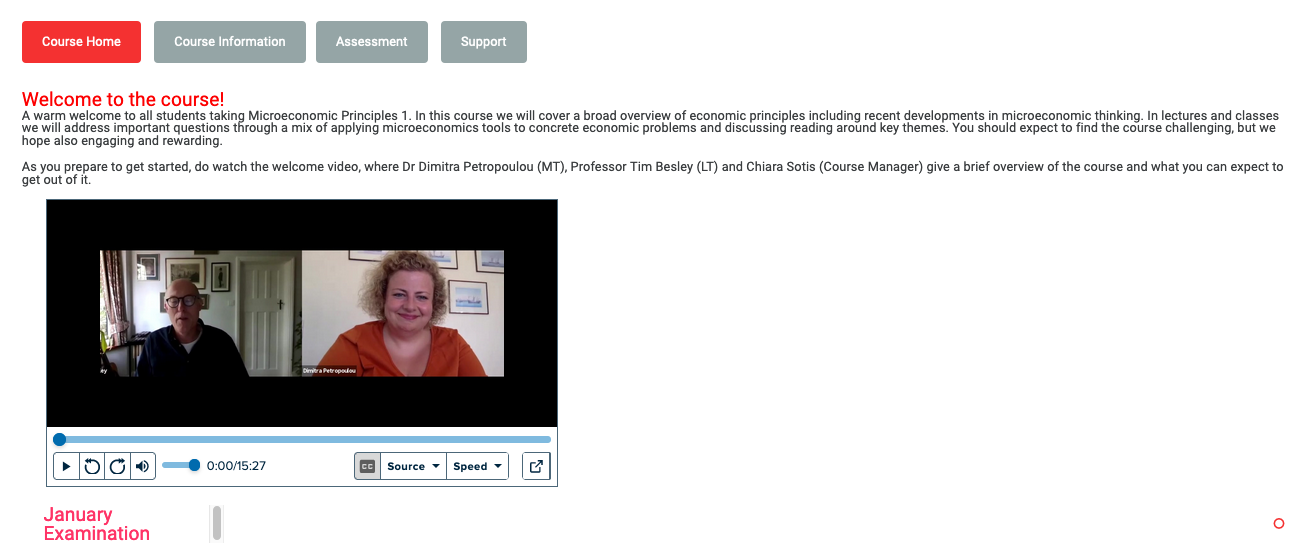 Introductory video embedded into the home page of EC201
Videos can be embedded into any part of Moodle so that they appear directly on the page and can be played from there. This can be done for videos stored on Echo 360 as well as outside sources such as YouTube. Not only does this mean that the student needs fewer clicks to access the video, it also adds immediacy and visual appeal to the video content in your course.
How you can do this:
-
From Echo 360: Embedding a video from Echo 360 into Moodle
-
From YouTube: Go to your video on YouTube, and click “Share” underneath the video. Choose the “Embed” option, then click “Copy” to get the embed code. Now go back to the page where you want the video to appear, edit it and click the ‘HTML’ button (indicated below). Finally, paste the embed code into the editor, and click ‘Save and Display’ to see your video.

Get your learning activities aligned
Where Trailblazer courses make use of a wide variety of different learning activities, each separate activity has a clear justification for its presence and is fully integrated into the course.
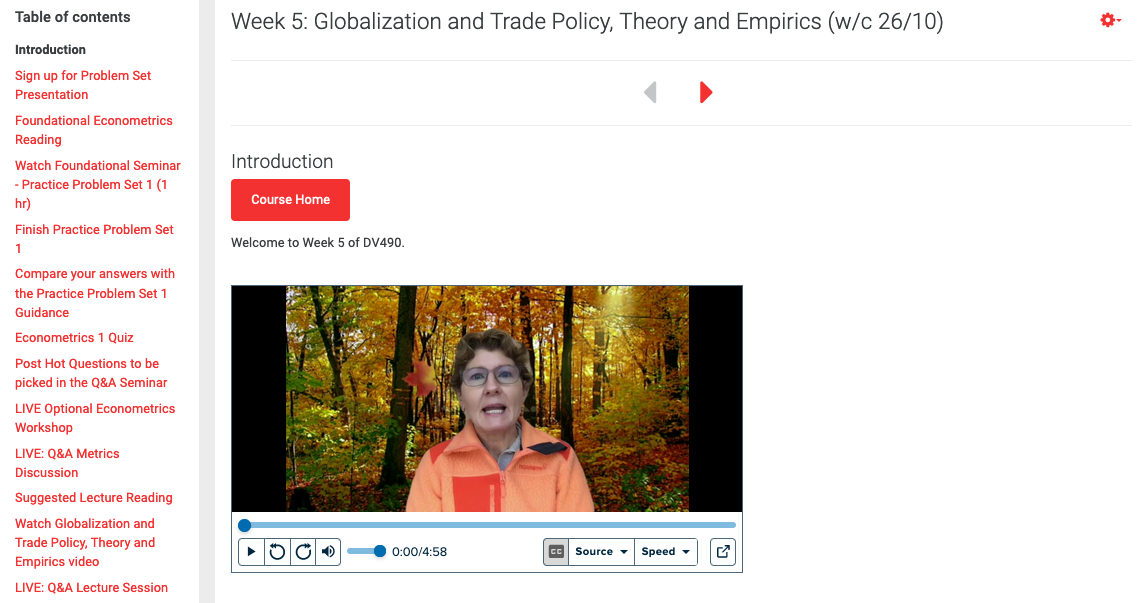 Learning activities for one week of DV490
The screenshot above shows the table of contents for a single week of DV490, in which you can see that there is a rich variety of learning activities laid out for the students. Each activity is aligned with the objectives for this week, and each one leads on to the next: the foundational reading leads on to the foundational seminar, which introduces the problem set, which is then downloaded and completed, and this leads on to the guidance, and so on.
The integration is enhanced when there is a clear link between the asynchronous activities and the synchronous events - e.g. in the example above, students post “hot questions” in advance of the Q&A seminar, where they will hear their questions discussed and answered. In this way the relevance and value of each asynchronous activity is reinforced.
How you can do this:
-
Think of your course from the student perspective, as a sequence of learning activities to be completed. Some of these activities will be live events with you or another teacher present, and some will be completed individually or in groups. Work out how these activities need to be sequenced and how each one should relate to those that came before and those that follow.
-
Specify the learning objectives of each week, and make sure each learning activity is explicitly addressing one or more of those learning objectives. This is known as “alignment” (see ILOs and constructive alignment from Imperial College).
-
Use the Moodle Book resource to lay out the sequence of activities (see the “Weekly schedules” section of this resource).
- You can still have optional activities, but you can align them with the course by explaining why they are optional and how they will benefit the student if undertaken.
Give your students a personal welcome
Each Trailblazer course has a “teaching team” page as part of its course information. This page presents names, contact details and photos of the teaching team, including lecturers and teaching assistants.
 Lecturers’ details for GY427
In the example above, the two lecturers for the course are introduced by way of photos, contact details, and short biographies. Other Trailblazer courses go further and provide similar details for all teaching assistants as well. In some cases, there is also a short video in which the lecturers introduce themselves.
All of this makes for a welcoming environment and helps students to make sense of roles and responsibilities within the wider teaching team. An introductory video is particularly appropriate when there is pre-recorded video content by the same lecturers included in the course.
How you can do this:

-
Add key details, such as name, role, email, room, office hours, academic interests, hobbies, etc. - anything that will help your students get to know the teaching staff better.
- Making an introductory video is also fairly straightforward using tools already at your disposal (see Basic video content for teaching).
Help students find all the support they need
All Trailblazers provide a page listing the different means of support that a student can call upon - at course, department and School level.
 Support page for PH103
The example above from PH103 provides links so students can seek support from the course tutors in different ways, as well as links to School-level support such as LSE LIFE, Wellbeing, the Eden Centre and the Library.
Placing all these different types of support on a single page means that a student who is struggling knows where to go to find support, regardless of the type of problem they are encountering with their studies. Bear in mind that such a page could become over-long and difficult to navigate if it tries to cover every possible student problem. By focussing this page on the main types of support that you know your students tend to experience, you can keep it compact and effective.
How you can do this:
-
Identify the main sources of support that you want to include and find web links or email addresses for each one.
-
Create a Page (or a page within a Book) to host the Support page (see Create a Page or Create a Book).
-
Place the page in a prominent position within your course, where students are likely to see it early on and be able to find it easily when they need it. For example, the PH103 support page is prominently visible within the first “Welcome to the course” section.
Release the teaching power within your class
Some Trailblazer courses make use of activities where students take on some of the roles of the teacher, such as peer assessment, in which students are asked to provide feedback on each other’s work according to a marking scheme, and “students as producers” initiatives, in which students are asked to create support materials for their peers.
 LL232 provides an extra mock exam which is peer-assessed using the Workshop tool
Peer activities such as these, in which students take on some of the responsibilities of the teacher, can be a highly effective approach to learning. In the case of LL232, peer assessment was used on the second of two mock examinations. Such activities primarily benefit the student who carries out the marking. As the student works towards a good understanding of the marking criteria, and then applies them to the work of another, they come to recognise what ‘good’ looks like in their subject.
Meanwhile DV490 introduced a “students as producers’ activity. Students were invited to record and share short “how to” videos on technical or methodological topics. The benefit of this is not so much in the finished product (although those may well be useful) but in the making of the videos; in order to teach complex ideas to a peer, the student must first achieve mastery themselves.
How you can do this:
-
Review the advice on peer assessment provided by the University of Reading (see Peer assessment)
-
Review the advice on Students as Producers projects from the University of Bristol (see Students as producers)
-
Contact Eden Digital for advice on the tools that you can use in Moodle and beyond to support peer assessment.
- Once you have an idea for your Students as Producers activity, contact Eden Digital for further advice and assistance.
Create an attractive front page for your course
Many Trailblazer courses make use of a common graphical theme across different images, to create a consistent and professional-looking appearance.
 Monochrome imagery for HY120

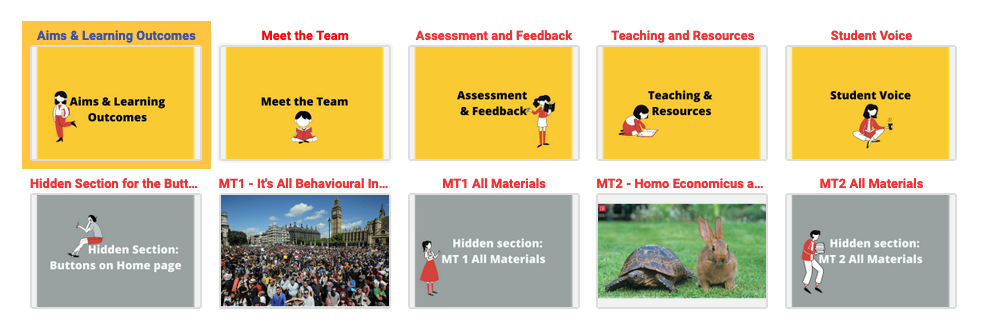
Different styles of image for different categories of section in PB100
The ‘Grid’ format that is used across most Trailblazer courses presents the sections of the course as small images. Any image can be used in the Grid, but a neater and more impressive appearance can be obtained if the images are carefully chosen such that they are all of a common style. The example above from HY120 shows how the course author has used only black-and-white imagery to create a consistent effect.
You can also use different ‘families’ of imagery to identify different sections by their purpose. In the PB100 example above, the weekly sections of course content use photographic imagery, while sections providing general information use cartoon imagery on a yellow background. There are also hidden sections containing resources that are linked to from elsewhere; these are indicated by the grey cartoon images.
How you can do this:
-
Decide whether you want to use a single graphical style, or different styles for different purposes.
-
Build up a collection of images for the purpose. There are various sources of free imagery online that you might use, such as Unsplash (Unsplash: Beautiful Free Images & Pictures), Pexels (Pexels: Free stock photos), Pixabay (Pixabay: 1.9 million+ Stunning Free Images to Use Anywhere), as well as the LSE Image Bank and other images from the LSE Photography Unit.
-
You can also create simple coloured banners in PowerPoint. Add a background colour, and optionally some text, and then save the slides using File > Export… and choosing PNG.
-
In Moodle, edit your course settings, and scroll down to “Course format” section. Set Format to “Grid format” and save changes. Then turn editing on, and you will see “Change image” links underneath each Grid section.
- If you need to modify your image in some way (e.g. cropping it), you can use the free software GIMP (see Getting started with GIMP).
Tap into your students' creativity with informal activities
Some Trailblazer courses make use of light-hearted activities that allow students to show creativity and to engage with course material in a more informal way.

The ‘Wall of Fame’ for the ST102 five-minute challenge

The “Artistic Statistic Poetry Contest” in DV490
The first example above shows the leaderboard for the ST102 five-minute challenge: a weekly statistics puzzle for which students are invited to submit their answers, with the first 10 correct replies winning spots on that week’s leaderboard. The second image shows a video launching a poetry contest for DV490, in which students are invited to write verse on econometric themes. The second video is a compilation of some of the submitted poems.
Another example comes from EC210, in which each week’s live lecture is opened with a different piece of music, and these pieces are collected into ‘course playlist’ on YouTube.
These examples provide for a more informal online environment, in which students are able to bring their creativity and a spirit of competition to bear on their studies.
How you can do this:
Increase student engagement using interactive media
Several Trailblazer courses make use of interactive video to embed self-test questions into pre-recorded video content.

Question appearing within a video lecture for GY427
Moodle’s “H5P” toolkit can be used to create interactive videos, in which questions and other interactions are embedded into the timeline of the video. This can be used to increase engagement with the content of the video, and also provides opportunities for reflection during the video, so that video-watching is not a passive activity for the student.
H5P is a web toolkit that allows the easy building of interactive online content. It can be used anywhere on the web, and is integrated into Moodle as the “Interactive content” tool.
How you can do this:
Find out what's on your students' minds with Hot Question
Hot Question is a Moodle activity used on some Trailblazer courses to allow students to “vote up” questions so that the most common questions can be addressed by the teacher.

Hot Question activity used in LL232 to gather students’ questions
The example above shows the Hot Question activity in action. A student is able to enter a question that they have about the course, but they are also able to see others’ questions, and to vote for them if they have the same question. Questions with the most votes float to the top of the list, so the most pressing concerns can be addressed.
This can be used in advance of a class or seminar, and the results used to plan the focus of that event; or, as in the example above, a video can be recorded by the teacher to give answers to the most popular questions, and this video can be made available on Moodle.
How you can do this:
-
Add a Hot Question activity to your course (see the official Moodle Docs for Hot Question)
-
Make sure that you always address the questions asked via Hot Question, either in class or via the VLE. Engagement may be low at first, but as students start to see how others’ questions are being answered, more of them will get involved.
Better quality videos, without the time and expense
Some Trailblazers are notable for the quality of the video content, where particular attention has been paid to lighting, framing and sound.
 Introductory video from HY120
High-quality video sounds like something that would require a large investment in equipment and professional videographers, but in fact you can go a long way towards achieving it by simply adhering to some basic principles. If you get the lighting, framing and sound right, you can make a good-looking piece to camera with an ordinary webcam or phone.
How you can do this:
Create a one-stop-shop for assessment
All Trailblazer courses make use of a single page or section in which all information and activities relating to assessment are stored, so students always know where to find it.
 The Grid format from PB100 shows the dedicated Assessment and Feedback section at the top
Assessment is one part of a course that is of supreme interest to all students, so it is vital that they can quickly and easily find all information relating to it, and submit what needs to be submitted. By having a single location for all assessment-related material, there can be no room for confusion.
It is important to be consistent when using this approach; having set up a one-stop-shop for assessment, it will inevitably cause confusion if certain assessment materials are placed in another section (even if it makes some logical sense to put them in that other section). In the example above, students will find everything related to assessment in the one section: instructions, marking criteria, guidance and the submission portals themselves.
How you can do this:
- Simple - create a section for Assessment, and make sure absolutely everything related to assessment is there, and there only.
Use video to get students off on the right foot
The GI424 Trailblazer provides a short video that explains how students should use the Moodle course itself.
 The Introduction to Moodle video in GI424
Although student use of Moodle is fairly intuitive, it can be useful to provide an introductory explanation of how your particular course is making use of it, and how students are expected to interact with Moodle. A short video is a simple and effective way to do this, because you can model the actions that you want students to carry out within your course. This in turn makes it much more likely that students will use the course in the manner you intended.
How you can do this:
Use tags to make your resources easier to find
Some Trailblazer courses make use of Moodle tags, which allow common types of activity to be identified and grouped together.
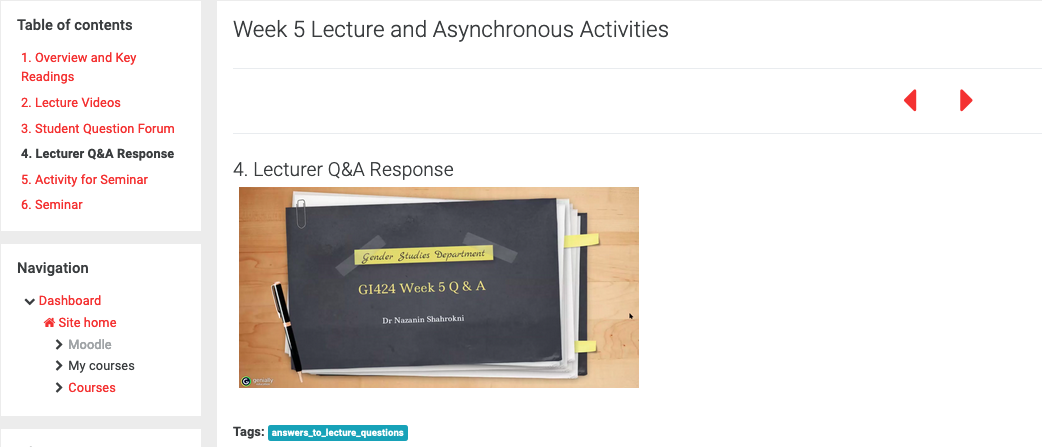 Page from GI424 showing a tag at the bottom

List of resources with a common tag from GI424
The examples above show tagging in practice in GI424. The top image shows a page from a book that gives answers from the lecturer to questions asked in a student Q&A forum. This page is tagged as “answers_to_lecture_questions”. Clicking on the tag takes you to the screen shown in the second image, where all other resources in this course with the same tag are listed. This can be a useful navigational aid to students where you have a complex set of resources, especially when those resources are intended to be used for reference.
How you can do this:
-
Decide which resources and activities in your course it would be useful to tag - typically resources that students are likely to refer back to. There’s no need to tag absolutely everything.
-
The set of things that can be tagged includes all activities and resources, forum posts, book chapters, wiki pages and glossary entries, amongst others.
-
To add a tag to something in Moodle, edit its settings. If it is taggable, you will find a section called “Tags” where you can add your tags. Clicking on the box will show ‘standard tags’ that are used across Moodle, but you can simply type in your own tag and press enter to create/re-use it. Each tag you add will appear above the tag field as it is added.
Make it easy for your students to give feedback
The PB100 Trailblazer features a “Student Voice” section which gathers a range of different ways in which students can have an influence on their studies.

PB100 Student Voice section
The example above shows some of the ways in which the course leaders and the department invite students to contribute: by promoting the TQARO survey, the SSLC, Departmental Teaching Committee and Undergraduate Consultative Forum, and the LSE Change Makers project. There is also a forum where students can comment anonymously on the Trailblazer course itself.
How you can do this:
-
Collect up all the different ways in which students can make themselves heard on your course, and put them all together in one section of your course, either as Pages (Create a Page) or as URL links to other sources (Create a URL).
-
Add an activity that allows students to comment on the course itself. For this you could use a standard Forum (Create a Forum), or if you would like students to be able to comment anonymously, choose the Open Forum (this is set up in much the same way as a standard Forum). Alternatively, use the Questionnaire tool if you would like to be able to easily download the results.
Change your most important links into buttons
Most Trailblazer courses make use of “course buttons” to provide salient links to important or often-used resources.
 Course buttons at the top of the course homepage for IR101
In the example above, the course buttons are shown at the top of the course (directly below the course header), and appear whenever the student returns to the course homepage. Each button links to a key resource stored elsewhere in the Moodle course. This allows those resources to be arranged across the top of the page and gives them an additional salience that they would not have in the form of a list (such as the resources shown underneath the video).
How you can do this (this one's a bit trickier than the others):
-
First, go to the resource, activity or web page that you want your button to point to, and copy the URL from the location bar of your browser.
-
Now create a link to that URL. You can do this in the text editor by selecting the link text, and clicking the ‘Link’ button on the editor (indicated below). Paste in the URL you copied.

- Finally, convert your link into a button. To do this, you will need to edit the underlying code of the web page. You can do this with the ‘HTML’ button, indicated below. Note that clicking this button toggles between code view and normal view, so you can check the effect of your code changes.
-
When the code appears, look for the section that corresponds to your link: it will look something like this:
<a href="[URL]" [OTHER STUFF]>[LINK TEXT]</a>
-
To change this into a button, carefully modify the code as follows, to add an extra expression:
<a href="[URL]" [OTHER STUFF]>[LINK TEXT]</a>
Finally, save your changes to see the button in place.
-
Please note that HTML code allows absolutely no room for error! If you accidentally leave out a quotation mark or an angled bracket, it may well mess up everything (in which case, just exit without saving the page, and start again).
Use 'stealth activities' to reduce clutter in your Moodle course
Trailblazer courses make much use of a Moodle feature that allows an activity to be made available to students via a link, without it appearing on the course homepage.
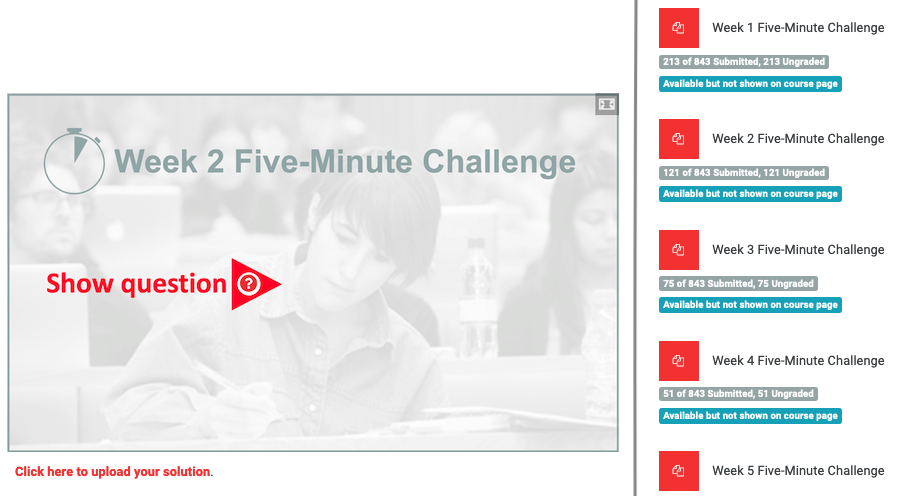 (Left) The 5-minute challenge in ST102 is accompanied by a link to upload a solution; (Right) The ‘stealth activities’ where the upload actually takes place
‘Stealth activities’ are not quite as exciting as they sound. The term simply refers to an activity setting that means that the activity is hidden from the course homepage, but can still be accessed by students if they are given a direct link to it. The purpose of this is that it allows you to reduce clutter on your course and to control the student’s path through your course material.
In the example above, the left-hand side shows a page from a Book, which presents the “5-minute challenge” and provides a link for students to post their answer. This link leads to an assignment, shown on the right, which is in a separate, hidden section of the course. The assignment activity therefore cannot be accessed by the student other than by clicking the link below the challenge itself. This keeps the course tidy, and allows the course leader to provide access to the assignment at the exact point where it is needed - i.e. immediately after the challenge is set.
How you can do this:
-
First add the activity that you want the student to be able to access (Add Activities). Try to put the activity into the same section where the link to it will appear, so it is easy to maintain in future. In the activity settings, under Common Module Settings, set the Availability to “Make available but not shown on course page”. Save changes and display.
-
Now go to the location bar of your browser and copy the URL of this activity to the clipboard.
-
Now go to the section, page or label where you want the link to this activity to appear, and add the text that you want the student to click in order to access the activity. Select that text, and click the ‘Link’ button on the editor (indicated below). Paste in the URL you copied previously, and save.
Back to top
Back to Technology-enhanced learning page